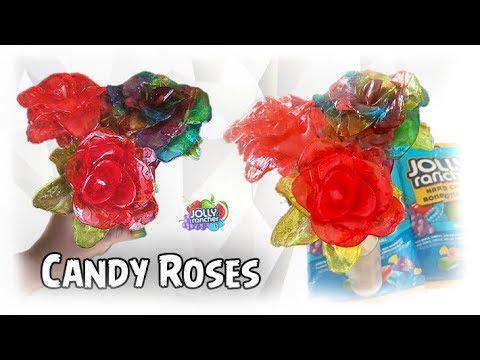
How to Make Jolly Rancher Roses!
February 10, 2021
Ladies and Gentleman, Valentine’s Day is upon us, and while many of us will be celebrating the fact we are single, some actually have a significant other to celebrate with, and that is who this article is for. That, and people who want to get ahead for Mother’s Day or have a friend/family member’s birthday coming up, or just want something to do during quarantine, you know what this article is for everyone! But mainly people who need a gift for Valentine’s Day…
Now, let me set the scene; it’s almost Valentine’s Day, and you want to get your girlfriend/boyfriend a gift that is both cheap and from the heart, and a great way to do that, if you ask me, is to make roses out of candy. Our specific candy of choice being Jolly Ranchers. Now you can actually go on youtube and find dozens of short videos on how to make these, so if you’re a more visual person here’s a link to one of those, but if you go to watch the video come back because I have made these Jolly Rancher Roses several times and have a few tips to share.
So, for those who haven’t watched the video yet, here’s how to make candy roses.
You’ll need,
As many jolly ranchers as you’ll need. (Roughly 1 bag of Jolly Ranchers from the dollar store makes 1-2 roses.)
A dozen or so kabob skewers
A glass/heatproof bowl
And a lot of water
The basic idea of how to make a Jolly Rancher Rose is that you will be softening and/or slightly melting the jolly ranchers, using hot water. The video which I provided will tell you to drop the jolly ranchers into a heatproof bowl filled with water, wrapper, and all, and microwave it for roughly 30 seconds to a minute. Then, once they have finished microwaving, you fish them using a fork, unwrap the candy and begin molding the now goop-like candy into general petal-like shapes. Once you have a petal-shaped to your satisfaction you stick it onto the kabob skewer and add petals until you are satisfied with how your flower looks.
Now, this method has worked for many people and I’m sure that it’ll work for many of you. Just put all the Jolly Ranchers in a glass bowl filled with water, stick in the microwave (maybe calibrate the cooking time) unwrap the candy, mold into petals, stick onto the kabob stick. Bada-bing-bada-boom, you got yourself the best kind of edible rose for your significant other.
However, having done this multiple times, I have created my own way of creating these candy roses and will be sharing it because I think it’s more reliable. Along with tips and general advice.
My Method
- The first thing to do is ditch the microwave outright. Again, I’m sure many of you can try this out for yourself and it will work and it might be easier for you, but for me, the microwave is too unreliable. The problem with the microwave is if you leave the candy in for too long, the candy will become liquidized and literally useless, it’s one with the water now and you’ll have to dump the water out and get more. But, if you don’t leave them in for long enough, the candy will not be soft enough to mold, and the water will cool down too fast for you to re-soften the candy. It’s like being Goldie Locks except you’ll ruin your limited supply of Jolly Ranchers if you get it wrong. So what I do instead of using the microwave is use boiled water from a pot. I pour the hot water into a glass bowl, refill the pot with cold/tap water and set it on low to heat up while I work. Then, I set the candy’s in my current bowl of hot water, and poke the candy with one of the kabobs sticks every once and a while until I can sink the stick about halfway into the candy. I fish the Jolly Rancher out using a fork and instantly get to work molding the candy.
- And the second thing I would tell you to do, which varies from the original method, is to unwrap the candies before you put them in the hot water, but do not put them in the water without the wrapper. Hear me out. If done correctly, once the candies are done resting in the hot water, they are extremely soft, and in some cases, very goopy, and will have stuck to the plastic wrapper. So, if the candy wrapper is still wrapped around the Jolly Ranchers, then it is very difficult to peel the wrapper off because the jolly rancher will want to stay stuck to the plastic. The only way to peel the wrapper off is to wait for the candy to reharden, which doesn’t take long and peel it off carefully, but by the time you do that, then the candy will be too hard to mold. So you’ll have to stick the candy back in the water. Congratulations, you just wasted your time. However, if you take the candy out of the wrapper and stick it into the bowl, no wrapper at all, then the candy will stick to the bottom of the bowl. The best way to do this, in my experience, is to unwrap the candy but keep the Jolly Rancher on top of the wrapper and set it in the water with the wrapper acting as a barrier between the bottom of the bowl and the candy. It will be easy to peel the wrapper off the bottom and you’ll instantly be able to start molding. Sometimes the candy will melt too much and stick to the wrapper, and you’ll have to wait a second for the candy to get a little hard, but it will still be soft enough to mold.
Again, it is totally acceptable to try the original method described in the youtube video I provided, but if you find yourself having difficulty, see how my method works!
Other Tips and Advice (and a few warnings)
- When molding the candy remember to dunk the candy back into the hot water for a second or two to keep it from getting too hard. The water should still be very hot, so try to keep your fingers just above the water.
- The first candy is always the hardest to put on the stick because the candy does not like to stick to the Kabob stick, unlike the plastic wrapper. My advice is to stretch the first candy so it’s longer than it is wide, then set the Kabob stick against the bottom end of the candy. The top end of the candy should be sticking up, and the tip of the Kabob stick should be resting about halfway up the candy. Next, curl over the top part of the candy over the tip of the Kabob, then circle it around. Not only is this an easy way to stick the first candy onto the Kabob, but this also creates a nice and unique flower center every time.
- Don’t be afraid of the molded candy doesn’t look exactly like a petal, or if it rips, or winds up too small, or too big. The point is that it looks nice when you look down on the actual flower.
- Number three being said experiment! Make big blooming flowers, make a small enclosed flower, fiddle with where you wanna put the pedal, turn it around, curl the top! Make thick petals, thin petals, long petals, short petals, broken petals! Make each flower unique!
- When putting the petals on the flower, they can be very slippery, sticky, and very wet! So make sure each petal has fully hardened to the flower before letting go or they might fall off! It might take a second, so just be careful! Don’t want a petal on the floor!
- The candy is very sticky, so Kabob sticks will too! Get rid of the stickiness on the Kabob stick with a paper towel and hot water!
- If you’re going to keep the Roses for a long period of time, keep them in the fridge! Outside of a cool environment, they might start falling apart!
- Your fingers are going to get stained. You can wear gloves, but it makes molding the candies hard, Pick your poison!
And the grand finale
Notes about the different flavors.
- Cherry. By all means, the easiest to work with. They melt quickly but are easy to separate from the wrapper. They are easy to stretch and don’t harden too quickly. Problem; they take a bit to stick to each other.
- Blue Raspberry. Easy to stretch, fast the melt, like to stick together. However, very goopy when softened and hard to separate from the wrapper. Best used for big blooming flowers.
- Grape. The rarest flavor out of the bunch. Slow to melt, hard to stretch, fast to harden. However, easy to take off the wrapper, and look very pretty as enclosed flowers. They like sticking to each other.
- Green apple. Fast to melt, easy to stretch. However, they harden very fast, are very goopy, and difficult to separate from the wrapper.
- Watermelon. The hardest to work with out of the original group of Jolly Ranchers. Slow to melt. Hard to stretch. Fast to harden. Sticks to the wrapper, and a pain in the butt to stick to the flower. These are the best for enclosed flowers. Do not try making blooming ones of these.
Tropical and Sour Flavors
- Sour Watermelon. Melts fast. Hardens fast. But surprisingly easy to form into petals.
- Sour Strawberry, stretches easily. Slow to harden. A little goopy, and sticks to the wrapper, but overall, very easy to work with.
- Lime. Slow to melt. Pain to stretch. Slow to harden.
- Mango is the easiest to work with. Fast to melt. Easy to stretch, Don’t harden too quickly..
- Fruit punch and sour cherry. Like to stick to the wrapper. Slow to harden, and fast to melt;
- Sour Green Apple. Stretches too easily and re-hardens way too fast.
- Pineapple. Really, all you need to know is that they don’t like to stick together for some reason.
- Sour Blue Raspberry is very sticky.
I hope I’ve encouraged people to try making candy roses! And not scared people away…